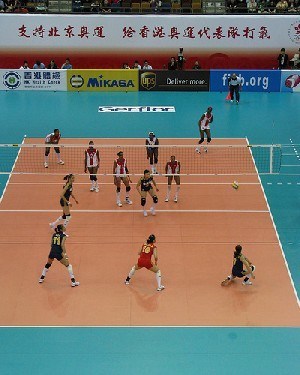
Volleyball rotations will be explained and diagrammed in detail on this page to help you get the most out of your offense. In order to get the most out of these diagrams, there are some things you should understand:
Keep in mind that these diagrams are based on a 5 1 offense. Since that is what our team runs, I am going to go through it with you. Realize that if a team is running a 6 2 or a 4 2 offense, a few minor changes can be made to make this workable.
All of these rotations are based on getting the setter in a position to set and to keep the best people passing the ball (outside hitters and opposite hitter).
Free Stuff!
Don’t forget to get your free volleyball tools. Check it out for more details!
You may look at these thinking that there is an easier way to line up. Feel free to experiment, but do not sacrifice efficiency for ease. I mean that just because it is easier to keep everyone where they are, that doesn’t mean they are the best passer or the right person to have there.
The key point here is that I am not trying to teach you the “easy” way. I want you to improve and if this guide helps you, then I have done a good job. If you feel that this is a step backward, then move forward with what you are doing.
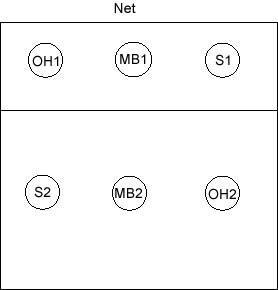
Here is a diagram of our basic 5 1 offense line up:
Since this is how we line up for our offense, this is going to be where each position is at in the rotations. The key is as follows:
OH – Outside Hitter
MB – Middle Blocker
OP – Opposite Hitter
S – Setter
With the players in this position, I am going to call this rotation one. Each rotation after wards will assume that the players have rotated one position clockwise like in a game. These positions are based on receiving serve.
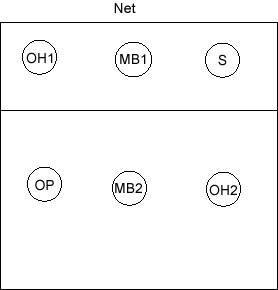
Here is the diagram for volleyball rotation one:
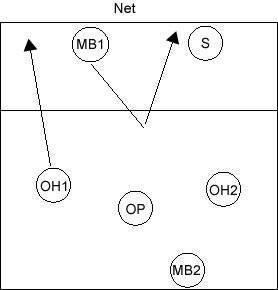
Rotation one has two front row attackers with the setter in the front right position.
The outside hitters and opposite hitter are going to be there for passing purposes. The OH1 is going to hit to the left like usual with the MB1 moving away from the net to make his approach for the hit.
MB2 is standing on the back line and is the voice for the team. As the serve is coming it is his responsibility to call the ball in or out. With him on the back line, if the ball is above his ankles, it is going to be out of bounds. This also keeps the middle blocker out of the way of the passers since the middle isn’t the best passer usually.
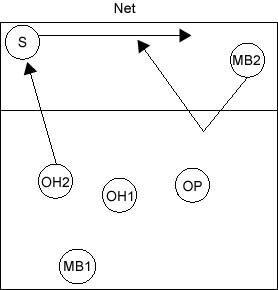
Got it? Here is rotation two:
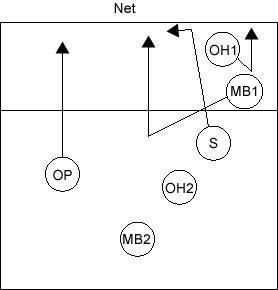 In this volleyball rotation, the setter is in the serving position and will be coming off the back row to set.
The middle is going to make their approach to the middle as usual. With the outside hitter and the opposite being flip-flopped, they will hit once in the positions shown, and then switch back to normal after the ball goes over the net.
The MB2 may have to step up and pass if the two passers cannot handle the passing responsibilities.
Make sure you also keep detailed volleyball statistics. The reason is that you want to know which rotations are your most effective and which ones are your worst. Only the volleyball statistics will tell you that.
Here is rotation three:
The setter is in the back middle in this position. This position will run very similarly to rotation two.
The opposite hitter and the outside hitter are going to hit as shown once, and once the ball goes over the net, they are going to switch back to their normal hitting spots.
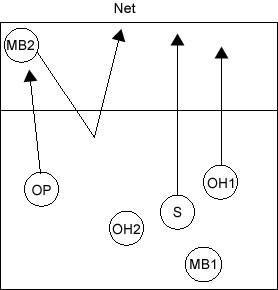
Here is rotation four:
The setter is on the back left but can come closer to the net as he is not overlapping the middle blocker.
The OH2 and the OP in this volleyball rotation are going to hit in their normal places.
The middle blocker will be back on the line to call the serve as usual.
Here is rotation five:
The setter is in the front left position for this rotation. With the setter in the front row now, there are only two attackers this volleyball rotation.
The MB2 will move to their hitting position as the ball is served and the OH 2 will hit as usual in the front left.
The three passers will round off this rotation and make it optimum for the offense. If the pass is tight to the net, the setter will still have the option of dumping the ball since they are on the front row.
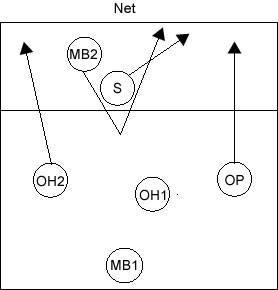
Here is rotation six:
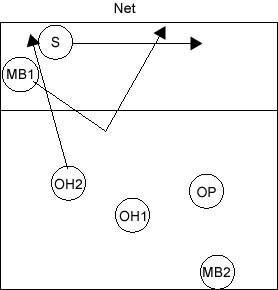
For the final rotation, the setter is in the front middle position. He will slide over to get into setting position.
The MB1 and the setter are going to “stack” in the corner so that the OH2 (who is in the front right position, can pass and still hit the left side. By the MB1 and the S moving to the left corner, they are not out of rotation and are legal.
The MB1 will hit in the middle as usual with the OH2 hitting left as usual.
The stack simply lets the offense run as usual with the best passers in place.
Basically, that is the breakdown. Use these diagrams of volleyball rotations to improve your placement of players while running your offense.
If you like this page, you might also like the page that has volleyball training aides.